These patterns are free for your personal or charitable use. You may not sell them, or seek personal profit from them. You may use them to raise funds for legitimate charitable purposes.
Showing posts with label good ideas. Show all posts
Sunday, November 17, 2013
Saturday, December 3, 2011
Thrift store find
I'm a fool for a good thrift store. I love uncovering a bargain, finding useful items, and scoring big on those occasional designer clothes with $4 price tags.
Last weekend, I did a little thrift-shopping and came across a collection of fabric-painting hoops. I thought they'd be perfect for displaying my stitched designs. I snatched up the entire inventory.
It wasn't until I got home that I thought of actually using them for their intended purpose...
Wanna have some fun? Grab your colored pencils and get to it! This simple blackwork pattern (you can find it on the "Blackwork Smalls" page) came to life when I used colored pencils:
Dry pencil gave me a pretty, almost pastel appearance.
When I dipped the tip of the pencil in water, the colors became much more vibrant:
Once I completed the coloring, I set the colors by placing a paper towel over the design and pressing it with a hot, dry iron for 30 seconds. It seemed to work fairly well with a practice piece, though I would not recommend this method for cloth that will be washed frequently.
It makes a great ornament and it's a quick and easy way to give your blackwork some amazing color.
Wednesday, November 30, 2011
Quirky Twee from France
One of my favorite things about designing patterns is seeing what people do with them. Earlier this week, I got a message from Michele in France. She had completed her version of the Quirky Quistmas Twee and wanted to share the photos:
I especially like her use of metallic thread on red and green fabric. It really sparkles!
My directions advise that you fill the bottom biscornu with rice, but Michele used decorative gravel; she pointed out that rice could get wet and moldy.
Find out more of her stitching secrets at her blogs:
Sunday, November 6, 2011
Tennis elbow, Christmas, and Friends
A few years back, I developed a case of tennis elbow. Too much stitching resulted in searing pain that radiated down my arm making needlework far too painful to enjoy. I had several new patterns I wanted to stitch and share, but I simply could not do it. I don't release anything that hasn't been stitched, so several of my stitching sisters and brothers agreed to help out. I sent them patterns which they then stitched up, photographed and critiqued. It was a great help. The patterns made it onto my site and I made some wonderful friendships along the way.
That's how I met Maria. From our first emails it was obvious that we were on the same wavelength. She had me laughing out loud from the beginning, and even though she's half a world away and we've never met in person, our friendship is as solid as any I've ever known. That friendship was forged by the Quirky Quistmas Twee.
The imaginative Maria was playing with biscornus one day and stacked a few together, creating an adorable little tree. I loved her idea, so I designed several blackwork squares and we set to work stitching. This is what we came up with:
| The Quirky Quistmas Twee |
Maria did most of the stitching; I beaded the squares, then stuffed them, stacked them, and secured them with carpet thread through the middle. For complete instructions and pattern, click here.
The moral of the story? Don't be afraid to ask for help, and don't be afraid to lend a hand. The rewards are great.
Friday, July 22, 2011
Back to the Beginning
So I've been tooling along, talking about blackwork and sharing my patterns, thinking everything is hunky dory. Suddenly it hits me. I never explained what blackwork was. Yeah, there are a thousand sites that tell the story of Catherine of Aragon, Henry VIII, and Holbein. And yeah, there are some really great tutorials out there with wonderful diagrams. Why should I reinvent the wheel?
I'm not, really. I'm just consolidating information, making it easier for you when you come to visit. And besides, I have these nifty pictures I took and they shouldn't just take up space on my hard drive.
So here it is. The Basics of Blackwork.
I'm not, really. I'm just consolidating information, making it easier for you when you come to visit. And besides, I have these nifty pictures I took and they shouldn't just take up space on my hard drive.
So here it is. The Basics of Blackwork.
| Work the stitch in passes, or journeys. On the first journey, work the even-numbered stitches: 1,3, 5 etc. |
| On the return journey, work the 'in between' odd-numbered stitches: 6,4,2 etc. |
| You will end up where you started. |
| Side trips are worked as their own little journey. |
| Work the element in one direction, turn around... |
| ...and join back to the main path |
| Voila! In the traditional sense, blackwork looks the same on the back as it does on the front, though modern blackwork may or may not hold to that tradition. |
Wednesday, June 29, 2011
Baking bread, stitching slow
My husband looked at the ingredients on a loaf of bread last week. Saw all kinds of sugars and preservatives. Expensive, too. So I thought, why not? I bought some yeast and flour and set out on the internet to find out how to make bread. I found Simple Dollar. http://www.thesimpledollar.com/2007/11/04/homemade-bread-cheap-delicious-healthy-and-easier-than-you-think/
With easy step-by-step directions and photos, I found myself falling in love just as I had when I first picked up needle and thread. The first loaf wasn't horrible, but made for good practical experience. My second loaf was much nicer.
Light, fluffy, and makes outrageously great toast. Looks like this household has seen the last of store-bought bread.
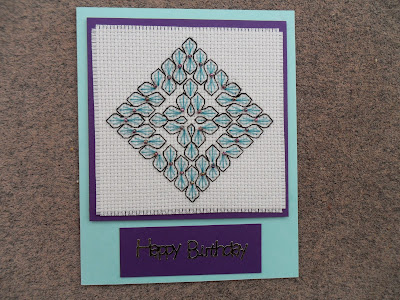
My blackwork has been slow going lately. I've got a few "pay it forward" gifts to finish, and since I really liked the way the wedding invitations came out, I thought I'd send out greeting card collections to my FB friends. The smalls I've posted on this blog are ideal for the project.
My friend, Barb Day at Gypsy Wools recently posted some photos of a beautiful silk thread in the most amazing peacock blue....
I couldn't buy the floss, but it did inspire a new design that I stitched in DMC rayon (sorry, can't remember the color number).
Winter was long, spring was a tough, but as summer progresses, I'm finding myself embracing the joy of life again. I hope the season brings you that same joy.
Friday, May 13, 2011
Flikr
South Doorway, a photo by Melissa Blake1 on Flickr.
Monday, April 18, 2011
Not your ordinary chicken soup
My niece is getting married and I'm stitching my pattern "First Step" for the invitations, which takes a fair amount of my stitching/blogging/design time, so I thought I'd share a recent kitchen success instead.
This savory dish isn’t your ordinary chicken soup. It’s a great way to use a chicken carcass. It takes time (chill overnight), but trust me, it’s worth it.
1 whole chicken with giblets
2 cups water
Roast chicken as desired, retaining carcass. Place giblets in water and simmer until water has reduced by one-third. Reserve and refrigerate giblet broth. Discard giblets unless you have something better to do with them. They are no longer needed.
After most of the meat has been removed, simmer carcass in 4 to 6 cups water for at least one hour. Remove carcass. Pull remaining meat from bones and add into the broth. Add giblet broth. Discard carcass.
1 onion, chopped
2 cloves garlic, minced
4 slices pepper bacon
For a milder pepper taste, rinse bacon. Cut bacon into small pieces then fry until crisp. Drain on paper towel. Pour off all but 2 TBSP bacon grease then sauté onions and garlic in bacon grease until tender. Add to soup. Add bacon bits to soup.
3 potatoes, peeled and cubed into bite-sized pieces.
1 15 oz. can white beans, drained
Add potatoes and beans to soup.
1/8th to 1/4th tsp cayenne to taste
1 tsp salt to taste
Simmer soup, uncovered, over low heat for at least 2 hours. Transfer soup to refrigerator and chill overnight.
At least one-half hour before serving, bring soup to a slow boil and simmer until hot. Serve with pepper sauce if desired.
Great with grilled cheese sandwiches or corn bread.
This savory dish isn’t your ordinary chicken soup. It’s a great way to use a chicken carcass. It takes time (chill overnight), but trust me, it’s worth it.
1 whole chicken with giblets
2 cups water
Roast chicken as desired, retaining carcass. Place giblets in water and simmer until water has reduced by one-third. Reserve and refrigerate giblet broth. Discard giblets unless you have something better to do with them. They are no longer needed.
After most of the meat has been removed, simmer carcass in 4 to 6 cups water for at least one hour. Remove carcass. Pull remaining meat from bones and add into the broth. Add giblet broth. Discard carcass.
1 onion, chopped
2 cloves garlic, minced
4 slices pepper bacon
For a milder pepper taste, rinse bacon. Cut bacon into small pieces then fry until crisp. Drain on paper towel. Pour off all but 2 TBSP bacon grease then sauté onions and garlic in bacon grease until tender. Add to soup. Add bacon bits to soup.
3 potatoes, peeled and cubed into bite-sized pieces.
1 15 oz. can white beans, drained
Add potatoes and beans to soup.
1/8th to 1/4th tsp cayenne to taste
1 tsp salt to taste
Simmer soup, uncovered, over low heat for at least 2 hours. Transfer soup to refrigerator and chill overnight.
At least one-half hour before serving, bring soup to a slow boil and simmer until hot. Serve with pepper sauce if desired.
Great with grilled cheese sandwiches or corn bread.
Tuesday, March 1, 2011
Never underestimate a good motif
One of the basic foundations of blackwork is the motif. A motif is a distinctive, recurring shape in the design of a picture. I like designing with motifs. They offer a continuity that I find most appealing.
![]() |
| "Link" is an elegant border motif |
I used this "link" motif in "Monarch" and again here, in "Erin":
| "Erin" |
Here's a motif that you can use to design your own custom pattern.
Go ahead, let your mind wander and think of the options...
Start Here.
Line up your motif for a fascinating border effect.
Overlap the elements of the motif and you can create a diamond shape that you can continue to expand as you like.
Add a border, if you like, or maybe a specialty stitch or two.
Saturday, August 7, 2010
Old Dog Learns New Trick
Subscribe to:
Posts (Atom)


